Everything You Need to Know About Planers: How to Use and Keep in Excellent Condition
In this article, we’ll cover everything you need to know about planers: how to use them correctly and how to keep them in excellent condition. We know that having a planer in good condition is essential to guarantee perfect finishes in carpentry and carpentry projects. Therefore, it is essential to know the best practices for using and maintaining this important instrument.
Our objective here is to provide the necessary information so that you can use your planer in the best possible way, obtaining professional results in your work. To do this, let’s start by explaining what exactly a planer is and its main characteristics. Additionally, we will cover the difference between manual and electric planers and introduce the different types of blades and their applications.
Table of Contents
What is a planer?
A plane is a tool used to finish wooden surfaces. It has a sharp blade that removes thin layers of wood, leveling and smoothing the surface. There are two main types of planers: manual and electric. Manual planers are operated manually, while electric planers have a motor that makes the work easier.
Within these types of planers, there are different types of blades: straight blades, bias blades, and meeting blades. Each of these blades has a specific application and it is important to know these differences to choose the correct blade for each job.
How to use a planer correctly
Now that we understand the concept of a planer, it’s time to learn how to use it correctly. Before starting to use the planer, it is important to prepare the workpiece, cleaning the surface and checking for possible defects, such as nails or irregularities in the wood.
Next, you need to adjust the planer correctly. This involves setting the desired cutting depth and also adjusting the blade angle. These adjustments are essential to obtain a quality final result.
With the planer properly adjusted, it’s time to use it. It is important to carry out the correct movements to obtain a perfect finish on the wood, in addition to being careful when handling the planer to avoid accidents.
Still on the topic of use, it is important to understand how to work with different types of wood. Each type of wood has different characteristics and requires specific attention. Tips for dealing with soft and hard woods, as well as grain direction considerations, will be covered here.
Planer maintenance
In addition to learning how to use a planer correctly, it is essential to know how to properly maintain it to ensure that the tool has a long lifespan and excellent performance. Regular cleaning of the planer, removing wood residue and using suitable products, is essential to avoid damage and ensure proper functioning.
Another important aspect of maintenance is blade sharpening. We will explain the step-by-step process for correctly sharpening your planer blade, as well as giving tips to ensure long-lasting sharpness.
Finally, we will talk about proper planer storage. Storing the tool correctly is essential to avoid damage, such as falling or rusting. We’ll give you recommendations on how to properly protect it so it’s always ready to use.
Now that you understand the importance of using a planer correctly and keeping it in good condition, it’s time to put the tips presented in this article into practice. With the information provided here, we are sure that you will be able to make the best use of the planer, achieving professional results in your woodworking and carpentry projects.,## What is a planer?
A planer is a tool used to smooth and level wooden surfaces, leaving them flat and uniform. It consists of a metal body, usually made of steel, which has a handle to hold and a sharp blade at the base. The blade is responsible for removing small layers of wood, correcting imperfections and leaving the surface smooth and ready to receive finishes.
There are two main categories of planers: manual and electric. Hand planers are operated manually, without the aid of electricity. They are more traditional and require skill and physical effort to use them. Electric planers are driven by a motor and have a mechanism that makes the blade rotate automatically, making the work easier and faster.
Within these categories, there are different types of blades available for use, each with its specific applications. The most commonly used blades are straight blades, which are ideal for planing large wooden surfaces. Spatula-shaped blades are best suited for carrying out precise finishes in corners and edges. In addition, there are also reversible blades, which have two sharp sides and can be used on both sides.
It is important to choose the appropriate blade for each type of work, taking into account the desired result and the type of wood that will be worked on. For example, for softer woods, such as pine, it is recommended to use blades with a higher cutting angle, while for harder woods, such as oak, blades with a lower angle offer better results.
In short, the planer is a fundamental tool for anyone who works with wood, whether to carry out small repairs or to create more complex projects. Knowing how to choose the correct planer for each type of work, as well as knowing how to use it correctly and keep it in excellent condition, will guarantee satisfactory and long-lasting results.,## How to use a planer correctly
A plane is a very versatile and useful tool for working with wood, but to make the most of its potential, it’s important to know how to use it correctly. In this section, we will explore the key steps to using a planer efficiently and achieving a perfect finish on your workpieces.
1. Preparing the workpiece
Before you start using the planer, it is essential to prepare the surface of the workpiece. This involves cleaning off any dirt or wood debris that could hinder the smooth glide of the planer. Furthermore, it is important to check for possible defects, such as knots, holes or cracks, which could interfere with the final result.
2. Adjusting the planer
Proper adjustment of the planer is essential to obtain an accurate and smooth cut. First, you need to set the cutting depth, adjusting the blade so that it removes the desired amount of material. Next, it is important to adjust the angle of the blade according to the type of cut you want to make.
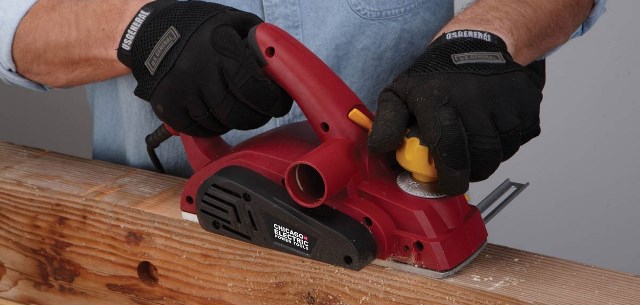
3. Using the planer
When using the planer, it is crucial to execute the correct movements to obtain a perfect finish. It is recommended to use smooth and uniform movements, always in the direction of the wood grain, to avoid scratches or damage to the worked surface. Furthermore, care must be taken when handling the planer, especially with your hands and fingers that are close to the blade, in order to avoid accidents.
4. Working on different types of wood
When working with planers, it is important to consider the different types of wood and their characteristics. When dealing with soft woods, it is recommended to use lighter pressure and gentler movements in order to avoid damage. On hard woods, it may be necessary to apply a little more force to obtain the desired result. Furthermore, it is essential to take into account the direction of the wood grain when working with the planer, to avoid any type of unwanted contraction or slippage.
By following these steps, you will be able to use a planer correctly and obtain excellent results in your carpentry work. Always remember that practicing techniques and keeping the tool in good condition contribute significantly to a perfect finish. ## Planer maintenance
Proper maintenance of your planer is essential to ensure it functions properly and has a long lifespan. In this section, we’ll cover some best practices for keeping your planer in tip-top shape.
1. Regular cleaning
The first step in caring for your planer is to perform regular cleaning. After each use, it is important to remove any wood residue that may remain on the blade and body of the planer. This can be done using a soft-bristled brush or an old toothbrush.
Furthermore, it is important to use suitable products to clean the planer. Avoid using aggressive solvents that could damage tool components. Choose specific products for cleaning power or hand tools.
2. Sharpening the blade
Correct blade sharpening is essential to obtain precise results and a smooth cut. To sharpen the blade correctly, you need to follow a step-by-step process. Initially, it is important to remove the blade from the planer and attach it to a sharpening jig. Then, use a sharpening stone or a file to sharpen the blade, always respecting the cutting angle recommended by the manufacturer.
Furthermore, some tips can guarantee long-lasting sharpening. One way is to use a sharpening stone with finer grains to finish the process, which will help you get a more precise cut. It is also important to regularly check the condition of the blade and, if necessary, repeat the sharpening process.
3. Proper Storage
Good storage of the planer is essential to avoid damage and ensure its durability. When storing the tool, make sure the blade is protected, either with a cover or a protector designed for planer blades. This will help prevent accidents and avoid possible damage.
Also, make sure the planer is stored in a dry, moisture-free location. Humidity can lead to the appearance of rust, which compromises the tool’s performance. If possible, place a packet of silica gel inside the storage compartment to help absorb moisture.
Taking the time to properly maintain your planer will ensure that it is always ready to use, cutting accurately and efficiently. By following the tips for regular cleaning, blade sharpening and proper storage, you will be prolonging the life of your planer and achieving excellent results in your woodworking.## Solving common problems
Proper maintenance of a planer is essential to ensure its efficiency and durability. However, even with all care, problems may arise when using the tool. Let’s discuss some common situations and their solutions.
A common problem is uneven blade wear. This may occur due to prolonged use of the planer in specific areas or contact with hard particles while working. To resolve this issue, it is important to regularly check the condition of the blade . If necessary, the blade must be sharpened or even replaced. Furthermore, it is recommended to carry out uniform movements and not press the planer excessively against the surface , in order to avoid uneven wear.
Another common problem is the presence of irregularities in the finish. This can occur due to several factors, such as inadequate adjustments to the cutting depth or blade angle. To solve this problem, it is essential to correctly adjust the planer before using it. Be sure to set the cutting depth according to the desired thickness and check that the blade angle is suitable for the type of wood being worked on . Additionally, use smooth, consistent movements when sliding the planer across the surface, thus avoiding the formation of ridges or ripples.
It is important to highlight that regular maintenance of the blade also helps to avoid problems with the finish. A sharp, well-maintained blade provides a clean, precise cut , resulting in a smoother finish. Therefore, invest time in sharpening the blade and ensure constant maintenance . Also try to regularly remove wood residues that accumulate on the surface of the blade, in order to avoid premature wear.
Finally, it is essential to identify and resolve problems as quickly as possible . The longer a problem persists, the greater the damage caused to the planer and workpiece. Therefore, if you notice any irregularities in the finish or difficulty using the tool, carefully evaluate the situation, identify the cause of the problem and take the necessary measures to resolve it .
In conclusion, knowing how to identify and solve common problems in planers is essential for quality work. Once we know the possible causes and solutions to these problems, we can use the tool more efficiently and obtain exceptional results. Always remember to keep the blade in good condition, adjust the planer correctly and use smooth and uniform movements . By following these tips, you will be able to enjoy a planer in excellent condition and perform your tasks more effectively.,## Conclusion
After exploring all the important aspects about planers, their importance in woodworking and carpentry projects becomes evident. The planer is a versatile tool, capable of providing a perfect finish on different types of wood. However, to ensure good performance, it is essential to use it correctly and carry out regular maintenance.
As we have seen throughout the article, it is essential to prepare the workpiece before using the planer, ensuring a clean and defect-free surface. Additionally, adjusting the cutting depth and blade angle are important steps to obtain accurate results. When using the planer, it is crucial to adopt correct movements and take care to avoid accidents.
Each type of wood has its own particularities, and knowing these differences is essential to work efficiently. Soft woods require special care, while hard woods require more strength and attention to the direction of the grains. Adopting the correct techniques for each type of wood will result in a quality and durable finish.
Planer maintenance is also a determining factor in its performance. Regular cleaning, using suitable products, will ensure that the tool is always ready for use. Blade sharpening is a process that requires attention and care, but is essential to maintain the quality of the cut. Finally, storing the planer correctly and protecting it from rust will contribute to its longevity.
It is important to remember that, even with all precautions, it is common for problems to arise when using the planer. However, identifying and resolving these issues becomes easier when you have knowledge about the tool. Problems such as uneven blade wear and irregularities in the finish can be overcome with practice and patience.
In conclusion, using the planer correctly and keeping it in good condition are fundamental steps to achieving satisfactory results in carpentry and carpentry projects. Putting the tips presented in this article into practice will certainly bring benefits, both in terms of quality of work and tool durability. So, get to work and make the most of your planer!